#support Scale-able Vector Graphics
Explore tagged Tumblr posts
Visit Tumblr Blog
Explore Tumblr blogs with no restrictions, modern design and the best experience.
Last Seen Tumblr Blogs


Fun Fact
130K people were victims of a chain letter scam that affected Tumblr in May 2011.
Text
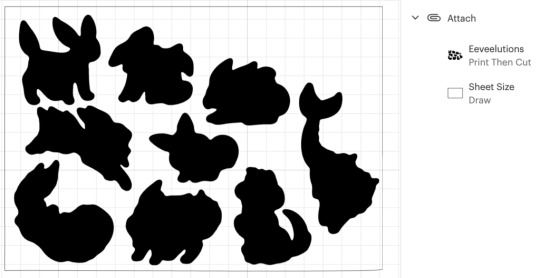
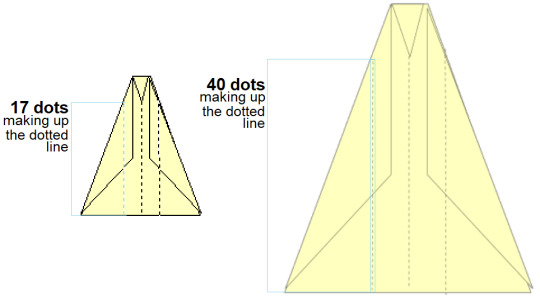
Cricut Hacks #2 - Template frames
Last time on Cricut Hacks we took advantage of Cricut’s scaling calibration to cut our graphics at a larger size than they were actually designed at in Cricut Design Space.
This time we’re going to use a template with registration marks to tell the Cricut where to perform cuts on a separately printed sheet of paper.
If you’re familiar with your Cricut, you probably see the below photo and have an immediate intuition about how to go about this hack! But I’ll share my method regardless.

Why?
Once again, we’re trying print larger than Cricut wants us to. This time, our reason for doing so is to avoid having to lose as much material to the registration marks as Cricut demands we sacrifice. It’s nearly 2cm around each edge, and if your printer already can’t print borderless-ly, you’re losing so much material!
Practically speaking, if you want to make A6 sticker sheets, you’d fit two on an A4 page, and if you wanted to make A5s you’d fit one, as shown in the diagram below.

I’m willing to reduce my sticker sheet to 200⨉140mm, but Cricut still won’t let me fit two of those on a page. So let’s get hacking.
Drawbacks
Before we launch into the method, here’s some things to keep in mind:
You’re no longer going to get perfectly aligned cuts, as the manual alignment introduces room for error.
If your printer has a skew, this will become particularly noticeable as you might be rotating graphics in a way that exacerbates the skewing.
You’ll have more manual overhead for preparing your sheets.
I’m pretty fast at preparing my files now, but you still need to cut out each sheet to give to your cutting machine, which feels a little silly because the machine was meant to take that work away from us.
You need more software than just doing everything in Design Space.
I mention Adobe Suite software here, but others will be able to do most of this fine! I’m just indentured to Adobe. Don’t be like me, learn your hotkeys and workflows in the Affinity Suite and support perpetual licensing in software!
Method
Step 1: Prepare your sticker graphics
I prepare my images and vector cutlines outside of design space. This means I can have areas of the sticker sheet that aren’t cut out, like my logo and social media links.
The first file you need is the one you’ll be printing. Repeat your design on your page as many times as you can fit, and then also place some marks for manual trimming. Here’s my example file (sorry about the watermarks). Notice the black lines in each corner of the page, and the lines in the middle of the page.

Print this file at 100% scale. Your printer might try to automatically scale your graphics to comply with your printer margins. Make sure that doesn’t happen!
Step 2: Prepare the cutlines
I generate the shape for each sticker by selecting the character in Photoshop, then use the Select => Modify => Expand menu item to add a border. I usually go with 20 pixels, which is a little more than 1.5mm at 300dpi.
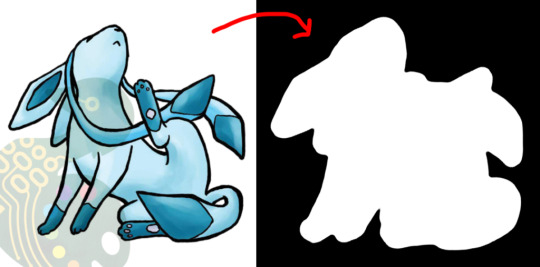
I then pull the black and white shapes into Illustrator and use the Image Trace tool to generate the vector outlines that will be used for cutting. I generally use the “Silhouette” preset, and then apply some smoothing to the lines (Object => Path => Smooth…).
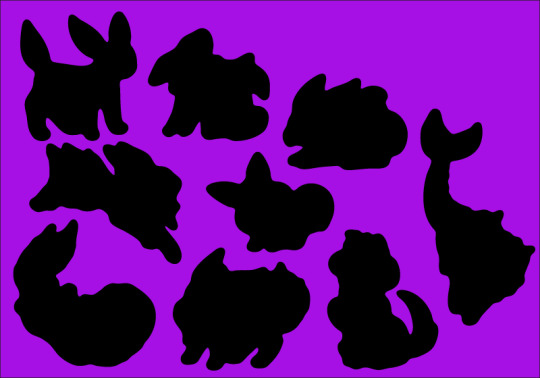
Make sure to have the outline rectangle for your graphics as a separate image object as the rest of your graphics (you may need to “release compound path” or delete the outline and replace it with a rectangle, this will also get rid of any wibble that might have come from the image trace)
After these tweaks, I have a file ready to import into Design Space. Export it as an SVG (In my experience, the scale will be accurate if you use the Export menu item rather than the Save As, but other methods can cause scaling issues so just check the size once imported)
Step 3: The Template
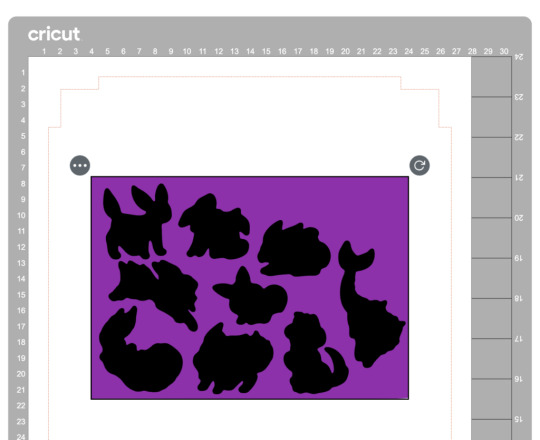
Import your SVG into Design Space. Then, make sure all objects are grouped in an “Attach” group so that they’ll print and cut with your pre-prepared arrangement, and mark them all as Print and Cut.

Click Make, but we’re not going to be sending this file to your Cricut yet.
In the alignment page, move your graphic about 3 inches down the page, which will be enough clearance so that you can place and remove the sticker sheets into the templates without needing to unload the cutting mat.
Then in the “Send to Printer” dialog, choose to “Add Bleed” and “Use System Dialog”. The system print dialog will pop up (or under, if you’re on macOS – drag the Cricut window away to find it) and you can print your file to a PDF.
Open your PDF in a graphics editor and make a white rectangle in the middle that matches your sheet size – in this case 200⨉140mm.
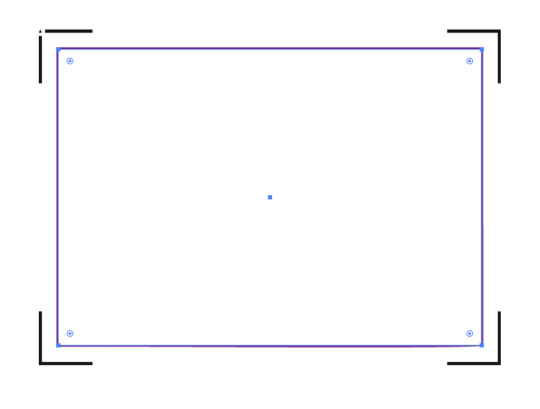
Print this file and use a craft knife and ruler to cut out the white rectangle. Try to be as accurate as you can!
PS, you could create the white void space and print the file directly from Design Space, but I like doing this because I can control a few extra things.
For example, Design Space won’t let me place my A5 graphic in landscape on an A4 page, but this way I can specify a larger paper size, then align the landscape image on the A4 page I’ll send to my printer.
Step 4: Cutting prep
Take the sheets you printed in step 1 and use your craft knife and ruler to trim them to size. Again, I’ve chosen 200⨉140mm for my sheets.
Place your template file on your cutting mat, taking note of the position of the void space.
Place your trimmed sticker sheet in your template, aligning it with the void. Use the extra border around the void to help judge how square your sheet placement is.
It’s almost time to hit Make, but we need to do one tweak in Design Space.
We don’t need to cut the outline rectangle of our sheets, because we’re trimming them to size before aligning them into the template.
Removing the rectangle, or setting it to a “Guide” line type will cause the print and cut margins to change. Instead, I denote the rectangle as a Pen line. We won’t be loading a pen, and the machine will waste a little time on this, but we’ll also be able to tell whether it’s aligned correctly while it traces the outline in thin air.
Step 5: Make
Press that make button!
Drag your graphics so that they roughly align with where you’ve placed them on the cutting mat.

Then on the next page, say “I’ve already printed” and select your paper type. The Cricut will suggest you load a pen tool and the blade – don’t bother with the pen tool
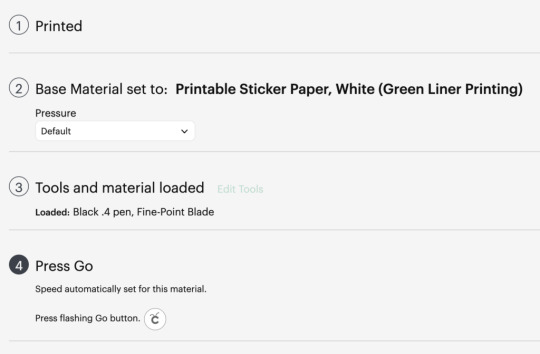
When you “Press Go”, the machine will start scanning for the registration marks.
It will then start drawing the outline of the sheet in thin air. While it does this, you can stare down the barrel of the empty toolholder to confirm that it’s aligned correctly with your page – if it appears to have misread the registration, you can cancel the job and try again. If it’s correct, your cutlines should also be correct.

And when the job is done, and all your cutlines are correct, you don’t need to unload your mat. Remove your sticker sheet from the mat by curling it away from the paper. Now you can place your next sticker sheet into the void and press the Go button again and it will cut your next sheet without reading the calibration marks again. After adding a bunch of extra steps and work into this process, it’s nice to get a little timesave!

Closing Remarks
Once you make a template for a particular sheet size, you can reuse it for all your files that share the same size. Consider cutting your template from a thicker GSM paper to extend its lifetime and make it easier to affix without skewing.
And finally, here’s the template with all its whitespace – that would have been wasted sticker paper if I cut this with the default workflow – next to the actual wasted material from my sheets. And a reminder, the sheet on the right fit two copies of the artwork vs the one on the left fitting only one!

Thanks for reading, if you found this useful please let me know!
"Cricut Hacks #2 – Template frames" was originally published on Chenonetta Creations
1 note
·
View note
Text
Clipping Path Zone: Your Trusted Clipping Path Service Provider for High-Quality Image Editing

With the digital age, businesses need high quality images to be seen in the competitive online marketplace. It doesn’t matter if you’re an e-commerce store owner, a photographer, or a marketer, the quality of your product images can either add to or detract from your sales and branding. Clipping Path Zone is here to help you with image editing services that will help you create flawless visuals. They are a leading clipping path service provider who offer various image editing solutions and turn your images into a polished and professional one.
What is Clipping Path Service?
Clipping path service is a process of carefully cutting an object or product out of an image using a vector path and leaving a transparent background. In product photography, this technique is critical for isolating objects, and it’s especially important that they can be showcased on a clean, distraction-free background. In e-commerce and advertising, e.g., where the images have to be clear and crisp to attract the attention of potential customers, it’s particularly useful.
Vector Conversion Service
Vector conversion is a very important part of image editing and Clipping Path Zone provides the best vector conversion services. The service also converts raster images into vectors so your images are always crisp and clear no matter the size. That’s especially important for logos, illustrations, and designs that need to be scaled up without losing quality. Their vector conversion service ensures your images remain of the highest quality whether you need to convert logos or simple graphics.
So why should you choose Clipping Path Zone?
Clipping Path Zone is a professional clipping path service provider who delivers exceptional results. The team of skilled designers on their side use the latest tools and techniques to deliver the most precise image editing. Here’s why you should consider their services:
1. Accuracy and Precision: With every clipping path, the team ensures that objects with fine details are isolated.
2. Affordable Prices: With competitive pricing, businesses of all sizes can enjoy high quality image editing with Clipping Path Zone.
3. Fast Turnaround: Quick turnaround times is what the company boasts about, having your project done within deadline.
4. 24/7 Support: Customer support is what we offer round the clock, so you get the help you need anytime you need it.
Image Masking Service
The image masking service is great for images with complex edges such as hair or fur. The smooth and realistic isolation of such intricate objects is possible and unwanted background elements are removed with this technique. If you are a photographer or an e-commerce business who works with detailed images like portraits or product shots with fine textures, then Clipping Path Zone’s image masking service is perfect for you.
Drop Shadow Service
The drop shadow service is a way of adding depth and realism to product images. With this technique you are able to create a shadow effect beneath an object to give the object a 3D appearance. Shadows add a dynamic to images, making products look more lifelike and appealing to customers. Drop shadow service provided by Clipping Path Zone makes sure that your product images got that extra bit of professionalism.
Background Removal Service
Clipping Path Zone also provides background removal service as one of its vital service. Their team can help you whether you want to remove a cluttered background, replace it with a solid color or another image. Background removal makes the product more visible to the customer. Especially for e-commerce businesses that rely on their products looking against a neutral or uniform background.
Ghost Mannequin Service
Ghost mannequin service is a game changer for fashion retailers and online clothing stores. This service enables the mannequin to wear a clothing item, without a model being present. It’s a great way to show your apparel in a clean, professional, but natural way. If you need to enhance your clothing product images with a realistic, seamless look, then ghost mannequin services from Clipping Path Zone are perfect for you.
Conclusion
If you are looking for all your image editing needs, this is your one stop shop. Whether you need clipping path service, vector conversion, image masking, drop shadow, background removal, or ghost mannequin services, their team is ready to handle any of these. They provide high quality, cheap and fast image editing solutions so that your images look flawless, professional and ready to make an impact. If you are in search of a reliable clipping path service provider then Clipping Path Zone is the name to be relied upon.
Company Information:
Website: https://clippingpathzone.com/ Facebook: https://www.facebook.com/clippingpathzone/ Contact : https://clippingpathzone.com/contacts/ Resources: https://clippingpathzone.com/blog/ Pinterest: https://www.pinterest.com/cpzmedia/ Twitter: https://www.linkedin.com/in/clipping-path-zone-187698137/ Quote: https://clippingpathzone.com/request-to-get-a-quote/ Skype: skype:Clippingpathzone?chat
Office Address: United States Office 30 North Gould Street, Sheridan, WY 82801 19173362276 [email protected] Bangladesh Office 1188/1, East Shewrapara, Mirpur, Dhaka-1216 Bangladesh 8801612348152 [email protected]
0 notes
Text
Ural-4320 Military Vehicle Scalable Vector Graphic – 7 Perspectives

Military SVGs refer to scalable vector graphics that depict various military-themed designs, including vehicles, equipment, insignias, tactical elements, and more. These digital illustrations are incredibly versatile, offering high-quality, detailed artwork that can be resized infinitely without any loss of resolution. This makes them ideal for a wide range of creative and technical applications, such as graphic novels, comic books, military-themed games, educational materials, and marketing projects. The flexibility of Military SVGs allows designers to easily adapt the artwork to different formats, whether it’s for print, web, or multimedia presentations. Commonly featured elements include blueprints of armored vehicles like tanks, trucks, and military aircraft, as well as tactical gear, military personnel, and iconic military insignias or badges. These designs appeal to a variety of users, including artists, illustrators, game developers, educators, and even military enthusiasts. Military SVGs can be easily incorporated into any project requiring a professional, detailed military aesthetic. They are often used in promotional materials, digital artwork, simulations, technical documentation, and educational tools to help audiences understand military vehicles and equipment with precision. Additionally, because they are digital and lightweight, Military SVGs are highly accessible for designers working in vector-based platforms like Adobe Illustrator, Inkscape, and other design software. Their ability to convey intricate details in both color and line art makes them essential tools for anyone looking to enhance their creative projects with military-style designs. By incorporating Military SVGs into your project, you ensure that your visuals maintain sharpness and clarity, regardless of the size or format, making them an ideal choice for both large-scale prints and smaller digital applications. Included Files - 2 Adobe Illustrator File Format - 2 Encapsulated PostScript (EPS) File Format - 2 Scalable Vector Graphic (SVG) File Format - 2 Preview JPG Ural-4320 Military Vehicle – is a detailed set of military vehicle prespectices for any type of digital art project. Included is a line art version, and colored with the lines. View other Military SVG's Here. Do you like downloading these free Scalable Vector Graphics that you are able to use for personal or commercial purposes? We are just getting this project started, and we aim to make this site big! Consider supporting the project here. This project is maintained and financed through a single individual, and I appreciate the support! Read the full article
#armoredvehicle#coloredvectorartwork#detailedvehicleSVG#digitalartasset#digitalillustration#graphicnovelvehicle#militarycomics#militarydesign#militaryillustration#militarySVG#militaryvectorillustration#militaryvehicleblueprint#militaryvehiclevector#scalablevectorgraphic#sevenperspectives#SVGmilitaryasset#tacticalvehicleblueprint#tacticalvehicledesign#technicaldrawing#Ural4320armoredcar#Ural-4320militaryvehicle#vectorlineart#vectormilitaryvehicle#vehicledesign
0 notes
Text
Fashion Design Software: Revolutionizing the Creative Process
Designers are always looking for new and creative ways to improve productivity, unleash creativity, and realize their ideas in the fast-paced world of fashion. Fashion designers can now more effectively visualize their ideas, make digital patterns, and experiment with materials, colors, and textures thanks to the industry's adoption of fashion design software. Fashion design software is essential to contemporary fashion, whether it is for creating intricate technical drawings, controlling manufacturing workflows, or creating new collections. This article examines the many varieties of fashion design software, their advantages, and the ways in which they are changing the fashion business.

Types of Fashion Design Software
There are various varieties of fashion design software, each suited to a certain phase of the design process. The most typical kinds consist of: 1. Sketching and Illustration Software: These programs let designers draft their ideas on a computer. These applications let designers readily alter and improve their illustrations, unlike traditional hand-drawing. Among the most often used drawing programs are CorelDraw and Adobe Illustrator. Because vector graphics are supported by both systems, scaling designs without sacrificing quality is made simpler.
2. Software for Pattern Creation: A key component of fashion design is pattern-making, which entails generating templates for clothing. This procedure, which was formerly completed by hand, is now far more effective when software is used. Prototyping time is decreased when designers use digital tools like as Otitis, Tucked, and Gerber Accomack to produce precise, detailed designs. 3. 3D Fashion Design Software: The creation of 3D design software is among the most important developments in the fashion sector. Designers are able to produce virtual 3D clothing that can be viewed and altered in real time with programs like as CLO 3D, Brow wear, and Marvelous Designer. With the use of this technology, designers can more easily identify design problems by seeing how fabrics will drape and move on a virtual model.
4. Textile and Fabric Design Software: This tool aids in the creation of unique designs, patterns, and textures for textiles by designers. Applications such as Adobe Photoshop and Leuctra’s Kale do Textile are often used for producing intricate textile designs that may be used on clothing. 5. Enterprise Resource Planning (ERP) Software in Fashion: ERP programs like Blue Cherry and Leuctra Fashion PLM assist designers and fashion companies in managing their operations outside of the creative process. With the help of this software, which can handle production schedules, inventory control, and supply chain coordination, collections may be finished on schedule and within budget.
Benefits of Using Fashion Design Software
The use of fashion design software offers numerous advantages, making the design process more efficient, sustainable, and creative. Below are some of the key benefits:
1. Enhanced Creativity and Flexibility: Fashion designers can explore more freely with various concepts thanks to fashion design software. Designers may quickly alter color palettes, fabric selections, and garment shapes with digital tools without having to start from scratch. Designers are better able to push the bounds of creativity when they can see their concepts through multiple iterations. 2. Improved Accuracy and Precision: Ensuring that the finished product reflects the original concept is one of the major problems in fashion design. Specifically, pattern-making software guarantees precise measurements and proportions, lowering the possibility of mistakes during production. This accuracy contributes to the production of well-fitting, size-consistent clothing.
3. Faster Design Process: Designers may complete the various stages of the design process considerably faster when they use fashion design software. Prototypes, patterns, and sketches can be made much faster than using conventional techniques. Fast design iteration enables quicker decision-making, assisting firms in following trends and meeting consumer requests. 4. Sustainability: Design software contributes to waste reduction, and sustainability is gaining traction in the fashion sector. Designers can produce virtual samples using 3D design tools, doing away with the necessity for numerous physical prototypes. This minimizes waste from fabric, lowers the cost of shipping, and lessens the fashion industry's total environmental effect.
5. Cost Efficiency: Fashion design software reduces expenses by accelerating the production and design processes. It is possible to detect mistakes early in the design process and require fewer physical samples. Fashion ERP software can also improve supply chain management, assisting companies in tracking inventories and cutting waste, which lowers manufacturing costs. 6. Collaboration and Communication: Team members may work together more effectively thanks to fashion design software. All stakeholders, including manufacturers, marketers, pattern makers, and designers, have access to the same digital data, facilitating communication and collaboration. Because of this digital connectedness, there is less confusion, improved communication, and a more seamless production process.
.Popular Fashion Design Software Solutions
There are many fashion design software options available, each offering unique features tailored to different stages of the design process. Below are some of the most widely used programs in the industry:
- **Adobe Illustrator**: Fashion designers love Adobe Illustrator for its vector-based drawing tools, which are ideal for producing intricate images and technical designs. It is frequently used to produce flat sketches and 2D designs, both of which are essential for conveying design concepts to manufacturers. - **CLO 3D**: Among the most sophisticated 3D design tools out there is CLO 3D. It helps designers envision how clothing will fit and move on a person by enabling them to produce realistic 3D apparel that can be viewed from any angle. The application offers an exceptionally lifelike design experience by supporting virtual textiles and textures.
- **Gerber Accomack**: This top-notch program is used for marking, pattern-making, and grading. It facilitates the creation of precise patterns by designers for a range of clothing styles, guaranteeing accuracy and uniformity throughout production. - **Otitis**: Another well-known 2D and 3D design program that offers capabilities for producing virtual samples and digital patterns is Otitis. Because of its 3D capabilities, designers can virtually see how clothing will fit and appear before making real prototypes.
.- **Leuctra Fashion PLM**: This all-inclusive fashion ERP system assists manufacturers and designers in overseeing the full product lifecycle. This program helps to assure timely delivery of collections and streamline operations from the initial concept to the finished result.
The Future of Fashion Design Software
Fashion design software will probably become increasingly more essential to the sector as technology develops. More individualized and creative fashion experiences will be possible with the development of artificial intelligence (AI), machine learning, and virtual reality (VR). Software driven by AI may be able to forecast trends, suggest changes to existing designs, or even come up with fresh concepts for designs based on data analysis. The way designers present their collections could be completely changed by virtual reality, which could provide immersive virtual runway shows and fitting experiences.

.In conclusion,
the way the fashion industry functions is changing due to the use of fashion design software. These technologies help designers be more creative, accurate, and productive in all aspects of their work, from sketching and pattern-making to production and marketing. The possibilities for fashion design innovation are endless as technology develops.
.
1 note
·
View note
Text
Version 535
youtube
windows
zip
exe
macOS
app
linux
tar.gz
I had a good couple weeks working on better petition-processing workflow for repository janitors. Most users won't see this, so you can ignore most of this release!
full changelog
krita and SVG
Thanks to two different users, hydrus gets Krita (.kra, .krz) and SVG (.svg) support today. Both formats also get thumbnails!
These formats can get quite complicated, so if you have one that won't import right (for Krita, it'll look like a zip; for SVG, probably HTML), please send it in and I'll have a look. Same for if the thumbnails are broken, although there's a limit to how clever we can go there.
Adding SVG also exposed that I don't have a good category/pipeline for handling vector vs raster graphics. Several things like thumbnail size calculations are different with an SVG (which has no true fixed resolution), so I will be doing several waves of background updates in future to handle this and other vectors better.Who knows, we might have beautifully zooming SVG media viewer support with one day.
petitions
Ok, this was almost all of my work this past two weeks. It kind of kicked my ass, but I'm happy it is done. It changes UI that only a handful of users see, so most users can skip over it completely.
For server admins, this new tech needs a server update, and it is not compatible with older clients (nor can newer clients talk to older servers), so please plan to update your server and janitors' clients at roughly the same time. It isn't going to break anything, but the client won't be able to do janitor work and will produce some harmless errors either way.
For janitors, I've made the petition processing page handle multiple petitions at once. There's a new panel, a multi-column list, and when you click the 'fetch petitions' button, it populates with as many petitions as you like. You can see and sort by the action (ADD, DELETE, REPLACE), account id, reason, and total size (e.g. '60 mappings in 12 petitions'), and then double-click any to highlight it in the normal petition UI you are used to.
This is about speed of processing. When you process a petition, it starts uploading in the background and the page moves immediately on to the next one. No more waiting for the server to summon another petition. Also, it gives you a better overview of your queue and even lets you mass-approve/deny a set of petitions when one account or reason keeps making good or bad stuff. You can fire off twenty petitions in one go and quickly move on to the next.
There's also some quality of life improvements. There's a little layout improvement. The current petition type you are working on is now highlighted with a '*' on the respective button. The page also remembers what type of petitions you were looking at, and what you set the 'show this many files' widget to, and the new 'how many petitions to fetch' value.
Now, what works in my small testing environment may struggle at scale, especially the PTR. I dump a good amount of new CPU into selecting this new petition list, so maybe fetching 40 petitions takes too long and you have to turn it down to 10, or maybe this lags out when you get a 100,000 mapping petition, or maybe the queue order is borked somehow. This is just a first version of this new system, so let me know how it works and I'll tune it.
And there is more I already want to do. The new list could do with a right-click menu for copying account id and retrying failures, and some of the widgets (sort-by, num files) could do with some show/hide tech on petition types they don't apply to, and it would be nice to have some shortcuts working. I also think the management panel is too tall now, so maybe I'll fold it somehow into tabs, or allow a double-wide panel, or just have more aggressive show/hide or resizable layout? In any case, I'll keep banging away at this.
next week
I've got a ton of normal small work piled up, so I'm back to that for a while. Thanks for your patience.
1 note
·
View note
Text
Hello everybody!!! Happy springtime ♪ ♪


I’ve recently found the motivation to start going through some WMFs that I found on my computer after taking apart some of the pre-installed programs that came with my computer (mostly just things like PowerPoint and Office), of very cute pre-00′s clip art graphics! However, Tumblr doesn’t support the uploading of WMFs. What I’ve decided to do is take the images at 100% size and converting them to PNG through MSPaint & fixing the transparency through Piskel, to then post them here as PNGs....
But, WMFs work by using both vector graphics and raster data at the same time, so if you were to enlarge a WMF, you would notice the picture scale up whilst not losing it’s quality but genuinely just becoming bigger; It’s hard to explain (here’s an explanation on how this all works), but here’s an example where I opened a WMF file in MSPaint at 100% size, then used an online WMF-to-PNG conversion tool that made it much larger in size- see how the dotted lines don’t get larger but instead multiply like magic!
So, I have decided to tag any of my future WMF-to-PNG uploads (the ones that go through MSPaint and Piskel, to stay at 100% size) as #WMF so that if you would like to use them for a project or just to have, you can find them easily through my blog’s tag search or archive & message me where I will be more than happy to send you the actual WMF files over your file sharing platform of choice... :)
(Oh, and my anonymous asks are open again now! Thank You All for being very respectful when contacting me after that post I made during December... I hope I will be able to manage this page and work on my standalone site more soon with this regained trust and comfort... just have to balance it with school! Please do not be afraid to ask questions or request anything, always!!! ^^)
53 notes
·
View notes
Note
I've got a video game suggestion-you've mentioned that your favorite quest in Witcher 3 is Reason of State, and I would like to hear your analysis of that quest.
This is truly a god-tier quest, a very good example of well-done quest design, that culminates a world’s worth of quest-building and features some exceptional character work. Since we’re going to be up to our necks in spoilers, there’s a cut here.
Reason of State might be the grand climax and resolution of the quest arc, but context in this is critical and that goes. The northern wars between Nilfgaard and the Northern Kingdoms is all over the games. Nilfgaard’s plan to assassinate Northern kings using Letho of Gulet is the entire plot of Witcher 2, and the war between Radovid and Emhyr forms the backdrop for Witcher 3. The Northern Kingdoms are almost all broken by the time of the Witcher 3. Temeria is occupied, Foltest was murdered in the Witcher 2. Natalis missing from the Witcher 3, and Vernon Roche forced to fight a guerilla war in caves. Velen is a broken land thanks to this war and under the absentee rule of the Bloody Baron. Aedirn is a non-entity, Stennis is absent no matter what happened in Witcher 2. Kaedwyn is gone, Henselt either being killed by Roche or Radovid and forcibly integrated into Redania. Only Redania remains, forcibly integrating Kaedwyn, but it is run by Radovid V. By the third game, Radovid is a cruel, psychotic king, but has a solid understanding of tactics enough to fight the Nilfgaardians to a stalemate (and he will win, without player intervention). Nilfgaard is responsible for a lot of Northern disorder, their campaign to use Letho to kill Northern kings successfully rid themselves of Demavend III and Foltest, the first of whom was able to successfully predict Emhyr’s movements while the latter is the leader of the most powerful kingdom and successfully defeats Nilfgaard’s invasion. But it’s not all Nilfgaard, Philipa Eilhart murdered King Vizimir II, Radovid’s father and one of the chief architects of the First Northern War victory, largely out of a bid for personal power. This paragraph shows that things are bad all around. Emhyr is a blatant expansionist responsible for a great deal of suffering, and the only man capable of resisting him is an open sadist relentlessly persecuting mages, which might be the only hope for the North to remain independent (it won’t be, but you have no way of knowing that at present)
When the player begins to be introduced to the characters, they’re framed as desperate men on the fringe. Roche is waging a crusade with his Blue Stripes, but the Nilfgaardian advance has been stymied largely by Redania and the two sides attempting to compete for the fleets and treasures of Novigrad. He’s forced to working with Radovid, who he openly doesn’t like, out of a practical need to do something. Ves is even throwing herself into suicide missions against Mulbrydale, out of a desire to do something worthwhile, a far cry from the man who was such a major mover of the plot in Witcher 2. King Radovid does not present well, acting psychotic in his introductory scene with the chessmen, and acting poorly toward Geralt, the player character and thus the vector for exploring the game world even if he is an established character (it’s worth noting that one of the best ways to get a player to dislike a character is to have them be rude to the PC, no matter how justified it may be in-universe). His mage hunts are also not likely to endear themselves to the player; the two primary love interests to Geralt and friends to Ciri are mages, and the witch hunters attempt to bilk Geralt of his reward by demanding the megascope crystal in Redania’s Most Wanted. Djikstra is helpful enough to Geralt during his hunt for Dandelion, but the two end on a bad note which isn’t entirely Djikstra’s fault since Geralt did lie to him; he’s notably nicer if you secure him his vault key, but that requires botching a quest and ends up causing Triss to commit torture to progress the storyline. The player character inclined to be friendly to Roche, if only because he tends to be straight and polite with you. Sure enough, Roche and Ves help out during the climatic fight in Kaer Morhen. Radovid isn’t even an option (and will kill Kiera Metz, further engendering hatred from the player since she’s another character Geralt can shack up with and Kiera’s absence means fellow Wolf School witcher Lambert dies). Djikstra doesn’t help you at all if you don’t get his key back, and if you do he gives you gold, which isn’t likely to be very significant since you’re likely swimming in coin by that point in the game.
One of the things I like in this questline is that this is a big and monumental quest, but you will lose it if you don’t take the time to get in good with the plotters, you’ll simply miss this quest. If you don’t get in good with the plotters, they won’t trust you. And if you beat down Djikstra instead of giving him information, he despises you and won’t bring you in on the plot, Geralt’s effectiveness as a Witcher and as a protagonist be damned. That’s something that more games need to be doing, rewarding players for investing themselves in the game with content. A lot of Triple-A games these days are so scared of players missing or cutting themselves out of content that they refuse to do this, which makes a lot of RPG’s feel far more shallow. I’m sympathetic to a point to game developers, content is expensive. Graphics and voice acting are expensive and losing content means spending money on content that’s not going to hit 100% of the audience. Thing is though, the same argument can be made for sidequests, or even for alternative conversation paths, so I don’t consider it a good enough excuse on its own. Avoiding this is as brainless as it is lazy.
When the game circles back after the Isle of the Mists, things are clearly reaching a breaking point. Djikstra has recruited like-minded conspirators to his cause to kill Radovid, each of whom have their own reasons. Djikstra, who worked with Radovid’s father, finds him a poor king unlikely to continue Vizimir’s great reign. Gregor the Redanian guard sees the devastation wrought by Radovid’s lynchings and persecutions and despises it, his loyalty to his country is too high to desert but he feels he needs to do something. Thaler and Roche are devoted to the idea of a free Temeria that they’re willing to back Djikstra’s play to bring an end to the Third Northern War. The player is likely to support the conspirators, Radovid’s support of the witch hunters has led to the deaths of non-humans since you need to complete Now or Never and save the mages; pogroms aren’t a great way to endear a player character to Radovid, especially since Zoltan the dwarf has been nothing but a straight-up pal to Geralt. This is a good tactic in RPG quest design, by making the least appealing result the default, it encourages the player to do the quests. As any GM can tell you, you have to make your players want to do the quests, otherwise they’ll do something else. Games are not able to just make up a new quest off the cuff like an improvisational tabletop GM can (this was one of my strengths as a GM, if you trust my players’ judgment), so they must heavily rely on getting the player to do quests. Some are mechanical, do this quest for XP and loot that makes you better at the game. The Witcher excelled though, at getting people invested in characters.
The conspirators’ play won’t work though, not without help from Phillipa; the hated mage is the bait that they need for the trap to work (and coincidentally, it won’t work without Geralt as well both because Phillipa won’t give her ring to any of the other plotters and by virtue of Geralt as the protagonist in the RPG). The trap is laid for Radovid, and if the player goes through with it, Radovid is executed by Phillipa, who flies off into the night having murdered yet another Redanian king.
Then, after the conspirators escape, the stage is set for Geralt to make a moral choice when Djikstra betrays the conspiracy. It’s a wonderfully set and acted scene, from Djikstra quoting a Macbeth stand-in to the patriots’ giddy excitement at the future. Then, the shoe drops and the conspiracy falls apart. Djikstra plans to become the next Vizimir, taking Radovid’s consolidated northern kingdom of Redania and Kaedwyn and fighting Emhyr to a standstill. Temeria would be subsumed into that, ceasing to exist. Naturally, this enrages the Temerian patriots, who refuse to go along with that scheme. It leaves Geralt with a choice, leave and allow Djikstra to murder Roche, Ves, and Thaler, or stay and defend them, resulting in a fight that will end in Djisktra’s death. This is often the case in partisan movements throughout history, where a power struggle over the shape of the victory to come causes disunity and strife, ending with one faction murdering the other ones, so points for historical and thematic elements being on point for the gritty fantasy. Similarly, by making the choice being the resolution of a conspiracy, it threads the needle between the protagonist doing everything and solely resolving the ending for one faction, which often feels shallow, and giving the player no agency which robs investment in the ending. By allowing the conspirators their machinations and taking advantage of others already in place, it allows the player to feel a meaningful impact that has wide implications. Fallout’s ending slides could be hit or miss, though the small scale of post-apocalyptica does make it more relevant. It hits a nice sweet spot, where it’s probably a bit too much to be realistic in a straight history but works just nicely for the scope of fantasy fiction. By forcing the player to do the quests for these people, not only does it meet the threshold of believability by explaining why they would bring Geralt on the quest save that he’s the protagonist, but it invests the player in the characters. Of course, this can only be done because the game did such wonders with its character work. Even if you don’t play Witcher 2, you see Roche love his country, you see Ves try to defend Mulbrydale, and they both can contribute meaningfully in the Battle at Kaer Morhen. Djikstra does influence the main plot and he can be funny with his sarcastic quips delivered by excellent voice acting. Thaler is less of a presence, but he’s also side-splittingly hilarious when he taught the trolls to swear, the player likes these characters and so likes the quest they’re in, and picking between them does actually cut deep in a way that Telltale Games “pick which character you want” drama can only hope to achieve in its wildest dreams. It’s political game storytelling at it’s best, using character work which is easier for players to identify with as I mentioned in my geopolitics essay.
Backing Djikstra is tough in the short run, because you lose three characters that you probably like. Roche and Ves, after all, did join you in Kaer Morhen and it seems cold for them to help and then betray them, unless of course, you didn’t ask for their help. Djikstra rules and reforms the North on a program of modernization, often contrary to the wishes of his subjects. Plenty might think that to be a path of success for the North, since Djikstra will build a military that will defend them and ensure a general level of prosperity. You just have to turn a blind eye to the Temerian patriots being slaughtered by Djikstra.
The alternative, backing Roche and Thaler isn’t a pure win either. Temeria becomes a province of Nilfgaard, but Emhyr gets Aedirn and Lyria. Emhyr finally wins his war and isn’t likely to stop his expansionist ways unless Ciri becomes Empress. Even then, he’s a senior statesman and can exert influence if he wants, Ciri even says so. We can get Roche’s perspective, and we like Roche. After all, he (probably) helps us out in the grand fight at Kaer Morhen, but he’s not an unbiased observer. He’s a Temerian partisan happy to sell out the other Northern Realms for a dubious pretense at some internal autonomy for Temeria alone. In plenty of ways, the Roche path is a collaborationist success story, selling out the North for Temeria alone.
The choice is yours to take and to make what you will. Plenty of folks might hope for a change in direction if they put Ciri on the Nilfgaardian Throne, but they might instead desire for her to adventure on her own as a de facto Witcher. In that case, Emhyr fails, is killed, and who knows what happens next? Could more provinces break away, might there be further wars in Nilfgaard, or power struggles, or something else. It could go a lot of different ways and it’s up to the player to decide. In a way, that’s amazing in its own right, because it’s actually what the real world is like. The absence of a golden ending is standard fare for grimdark, but that so much is left open shows a level of restraint and trust in the player that I admire in a developer.
Thanks for the question, Anon. Hope you liked it.
SomethingLikeALawyer, Hand of the King
24 notes
·
View notes
Photo

DEC PowerStorm 3D30 / TGA2 (March 1996)
PowerStorm 3D30 was an early low-cost 3D accelerator from Digital/Compaq. It cost just $795 and offered up to 1280x1024 in 256 colors (this was the maximum for all resolutions). Most of you presumably don’t know the card, because you could not find it in a standard PC. It was designed for DEC’s workstation based on Alpha CPUs. There is very little info about it (often not even correct) so I decided to consolidate all I know about it. This is what I know and what I was able to measure on a real hardware (thanks to Kyle Fox):
Basic description
The card uses the standard 32-bit PCI interface and contains three big chips. Cirrus Logic CL-GD5424 is an SVGA chipset and has its own 256kB of memory (16-bit). Its purpose is just to provide VGA compatibility during boot, before a graphic driver is loaded by the OS. There is even a switch on the card that can disable it (for multi-monitor solutions with multiple cards).
The Bt485A chip is a 170MHz true-color RAMDAC that has a standard input pixel port together with a separate VGA input port. Thus, it allows a cheap way to connect both graphics chips to a single monitor output and switch between them.
The main chip (“TGA2”) is the silver one manufactured by IBM (and designed by DEC). It’s a graphics controller with support for 2D, 3D and limited video acceleration. In this particular card (3D30), it has only 2MB of video memory, which cripples the maximum color depth to just 256 colors (PowerStorm 4D20 with the same chip supports also 12-bit and 24-bit modes).
In 2D/video, it offers standard BitBLT operations, YUV-RGB conversion and a very primitive 1-D video scaling with filtering (yes, hardware does the job only on horizontal axis; vertical scaling is handled by the CPU). There is no support for multiple 256-color palettes, which means that the video is converted to colors available for the whole desktop.
3D acceleration
The chip supports following features in hardware:
Double-buffering (contrary to SGI, the back buffer is stored in off-screen memory and copied once the frame is complete)
Z-Buffer (including the necessary depth operations)
Line and polygon drawing (wireframe, solid, smooth-shaded) ... contrary to several sources the chip is not limited to just wireframe drawing
Color dithering for 8-bit and 12-bit color modes
Fast color interpolation (for Gouraud shading)
Thus, there is no support for alpha-blending (transparency effects), fog and textures. Don’t expect playing GLQuake-like OpenGL games on this. The chip’s targets are 3D modeling/simulation and CAD/CAE.
DEC decided not to integrate geometry unit (transform & lighting) known from hi-end professional cards of the era and let the powerful Alpha CPU do the job.
We have tested the card under Windows NT 4.0 using our GPUbench program running under FX!32 emulation (fortunately, most of the tests generate very little CPU load so this doesn’t affect the results and the graphics driver runs as native code). This is one of very few cards being able to accelerate 3D in 256 colors with Windows.
The driver is limited to OpenGL 1.0.1 with extensions for vertex arrays. Unlike NT4 drivers for Matrox Millennium I/II and ATI Rage II cards, this driver is full ICD (installable client driver) so it handles the whole rendering pipeline. Early ATI and Matrox cards used MCD (Mini-Client Driver), which is basically a modification of the Microsoft’s OpenGL software renderer, where you can accelerate just the features available by the card (for example only untextured polygons). The issue with MCD is that you cannot accelerate the geometry processing. On the other side, MCD allows you to use even the features that are not supported by the card. DEC’s ICD driver completely ignores textures and does software emulation only for alpha-blending.
Having OpenGL acceleration in 256 colors brings color palette issues. The driver expects RGB 332 palette by default and if the application doesn’t handle this, colors will be wrong (OpenGL applications often didn’t care as they assumed at least 16-bit colors).
Performance
Rasterisation speed is surprisingly good with 69 Mpix/s (millions of pixels per second) with smooth-shaded (untextured) polygons. This decreases to 38 Mpix/s when Z-Buffer is enabled. This allows the card to render 60 fps in 640x480. For comparison with other cards (with enabled Z-Buffer): 50-MHz S3 Virge = 24 Mpix/s and 48MHz ATI Rage II+ = 21 Mpix/s, Matrox Millennium = 32 Mpix/s, SGI O2 = 56 Mpix/s, SGI Indy XL/XGE = 9 Mpix/s, SGI I2 Maximum Impact = 240 Mpix/s
Geometry pipeline can handle up to 606,000 vertices/second (516,000 with Z-Buffer) in a form of triangle strips or 329,000 independent triangles/second (291,000 with Z-Buffer). This is about 30-50% of UNIX hi-end and about 80% of PC workstation hi-end. Geometry performance is comparable with SGI O2(300MHz MIPS R5200 with vector units; 1998). Consumer cards in a Pentium MMX 200MHz PC could handle no more than 100,000-200,000 vertices/second and 40,000-70,000 independent triangles/s (with enabled Z-Buffer)
Alpha-blending done in software causes significant performance drops to just 1.4 Mpix/s. If it’s possible, it is better to avoid this feature and use stipple alpha instead.
Verdict
It seems that this was a good low-cost choice for powerful universal technical workstations. Geometry performance was especially good thanks to the power of Alpha CPUs, which made it a better choice over SGI’s low-end (Indy), until SGI O2 was released later that year. O2 was better was heavy 3D applications, but didn’t offer that good CPU performance.
Even with the Alpha-based workstations (like the Digital Personal Workstation 500a we used for this testing), there were other options for 3D acceleration. You could buy the same graphics chipset with 16MB ($2,495) to get full true color (32-bit or 12-bit for fast double-buffering) or go even higher for DEC’s rebranded Intergraph solutions (RealiZm Z13 with support for textures; $8,000).
In the low-end, Matrox Millennium I (MGA-2064) was a supported 3D accelerator. It offered better color precision (up to 32-bit in 3D) and 30-40% worse geometry performance.
Additional resources: Full GPUbench results, Open3D release notes, Video capabilities of TGA2 in Digital Technical Journal, Infoworld
PowerStorm 3D30 in VGA museum
#DIGITAL#DEC#PowerStorm#3D acceleration#3D#computer graphics#1996#1990s#Windows NT#workstation#VGA#graphics card#Matrox#Millennium#Intergraph#SGI#Indy#Maximum Impact
47 notes
·
View notes
Text
Design Jewelry Software – A Comprehensive Guide
Earlier, Jewelry designers tend to draw different designs for hours and days with hands. They carefully draw and re-draw the design until they achieve the perfect look. After the advent of Computer-Aided Design or CAD software, the process seems to become a lot easier and faster. Designers can easily draw different designs with the Design Jewelry Software and do many more things.
Three Popular Jewelry Design Software Programs!
2D Design Software
Gimp and Photoshop are the two commonly used graphics and art creation. The solutions are pixel-based. Gimp is commonly used for sketches, photo touch-ups, and artistic creation. There are different 3D tools, but artists still use 2D tools for many good things, including textures, sketches, and backgrounds.
2D CAD Software
The 2D CAD software solutions are commonly used in Jewelry design, including AutoCAD, Illustrator, CorelDraw, and more. It is best for engravings, technical drawings, preparing cuttings using vector technology, and millings. It is the Software to Design Jewelry in geometric shapes and textures. Vector's function is a unique way from pixels. It allows users to adjust, twist lines, scales, shapes, and curves infinitely.
3D CAD Software
3D CAD Software is the Design Jewelry Software that helps visualize the objects and represent them uniquely by using the collection of points in 3D. It allows the jewellers to create realistic designs and images that support the end products' visualization while stimulating how the design will perform before it is finally made.
Earlier, the designers need to block the wax sculpted to make models that were finally used to produce designs. Now, 3D images are created using the software, and it is very fast. The 3D printers are used to produce the prototype of the images. The interesting fact about the technology is that it can be customized to suit the Jewelry or design size.
What to Look for When Choosing Jewelry Design Software?
There are different software solutions available in the market that can help design Jewelry. But, it would be best if you chose the right Software to Design Jewelry. Here are a few things that you have to keep in mind to choose the right software solutions.
Sketch Features – You need to ensure that the Jewelry design software is compatible with 3D design tools and comes with different 2D design abilities that can impact vectors and scanned images or draw images designs from scratch efficiently.
Draft Kit – It is the feature that can set all imported scans as a cube to give a better 3D view of the final models. It makes the job lot easier as you only need to reproduce the curves in 3D to prepare the final model.
OS Compatibility – The Design Jewelry Software you choose must be compatible with the operating system you are using, including Windows and MAC.
Organic Modelling – 3D CAD Software solutions used for geometric shapes must be able to create volume. Since designing Jewelry is a creative process, and several draw inspiration is needed, the software must be perfect for supporting the free-form creation and enables you to create as many models as you want.
Functions – The software solutions you intend to choose must have different functions, including pave, prongs, baguettes, and settings. These are some complex features that professionals may need to produce unique designs and models efficiently.
Bas-Relief Design – The honeycomb design enables users to create visual symmetry and also allow the jewels to attract more light. The design is not possible to create with hands without using CAD Software. So, to achieve the Bas-Relief Design, you must need the best CAD software solution.
These are the factors you have to consider to find the best Design Jewelry Software for your Jewelry making business.
2 notes
·
View notes
Text
I will do eye catchy sports logo design with free source files
I will do eye catchy sports logo design with free source files for $5.
Hi
I am a graphic designer if you are looking for eye catchy,professional design then here i am the one, who fulfill your desires.
Basic $5 gig inclusion:
2 ideas to decide on from
Unlimited Revisions of the chosen conception
Free PNG JPEG and EPS Format
My services include:
Revisions and color choices supported your requirements/branding.
100 percent original vector emblem, scale-able to any size while not losing quality
PROFESSIONAL client service and communication in any respect times
Expertise
Prime quality work
order now
If you have any question, please message me know.
Thanks...........
https://www.fiverr.com/demetria_center/do-eye-catchy-sports-logo-design-with-free-source-files?context_referrer=user_page&ref_ctx_id=fec16fd9-4485-48d3-bffb-f40d7f7aa35b&pckg_id=1&pos=3
1 note
·
View note
Text
Scale-able Vector Graphics (SVG) Format Support & Enhanced SVG to XPS Rendering inside .NET Apps
What’s new in this release?
Aspose team is happy to announce the new release of Aspose.Html for .NET 18.1.0. Aspose team has included SVG namespace in this version of the API. It enables users to navigate, load or render the SVG file as per their requirements. Utilizing the features offered by this namespace, users can also render a SVG file to a XPS file. Aspose.HTML for .NET 18.1 has improved support for rendering an HTML file to PDF and other format files. Rendering devices including ImageDevice, XpsDevice, PdfDevice have been improved and enriched with features, and efficient rendering can be performed with Aspose.HTML for .NET 18.1.0. Below is the list of new and improved features added in this new release
Manipulating SVG formats
Improved HTML file rendering to PDF
Render SVG to XPS Conversion
Incorrect render result with CSS position property
Newly added documentation pages and articles
Some new tips and articles have now been added into Aspose.Html for .NET documentation that may guide users briefly how to use Aspose.Html for performing different tasks like the followings.
SVG to XPS Conversion
HTML to PDF Conversion
Overview: Aspose.Html for .NET
Aspose.Html for .NET is an advanced HTML manipulation API that enables developers to perform a wide range of HTML manipulation tasks directly within .NET applications. This API offers the capabilities to create as well as manipulate HTML files within your .NET applications. It also provides the features to iterate through HTML elements, Nodes, extract CSS information, edit or remove HTML nodes, configure a document sandbox which affects the processing of CSS styles, rendering of HTML to PDF, XPS or raster image formats and much more.
More about Aspose.Html for .NET
Homepage of Aspose.Html for .NET
Download Aspose.Html for .NET
Online documentation Aspose.Html for .NET
#HTML file rendering to PDF#support Scale-able Vector Graphics#SVG to XPS Conversion#Enhanced support for SVG images#.NET HTML API#Convert HTML to raster image
0 notes
Text
Ural-4320 Military Vehicle Scalable Vector Graphic – 7 Perspectives

Military SVGs refer to scalable vector graphics that depict various military-themed designs, including vehicles, equipment, insignias, tactical elements, and more. These digital illustrations are incredibly versatile, offering high-quality, detailed artwork that can be resized infinitely without any loss of resolution. This makes them ideal for a wide range of creative and technical applications, such as graphic novels, comic books, military-themed games, educational materials, and marketing projects. The flexibility of Military SVGs allows designers to easily adapt the artwork to different formats, whether it’s for print, web, or multimedia presentations. Commonly featured elements include blueprints of armored vehicles like tanks, trucks, and military aircraft, as well as tactical gear, military personnel, and iconic military insignias or badges. These designs appeal to a variety of users, including artists, illustrators, game developers, educators, and even military enthusiasts. Military SVGs can be easily incorporated into any project requiring a professional, detailed military aesthetic. They are often used in promotional materials, digital artwork, simulations, technical documentation, and educational tools to help audiences understand military vehicles and equipment with precision. Additionally, because they are digital and lightweight, Military SVGs are highly accessible for designers working in vector-based platforms like Adobe Illustrator, Inkscape, and other design software. Their ability to convey intricate details in both color and line art makes them essential tools for anyone looking to enhance their creative projects with military-style designs. By incorporating Military SVGs into your project, you ensure that your visuals maintain sharpness and clarity, regardless of the size or format, making them an ideal choice for both large-scale prints and smaller digital applications. Included Files - 2 Adobe Illustrator File Format - 2 Encapsulated PostScript (EPS) File Format - 2 Scalable Vector Graphic (SVG) File Format - 2 Preview JPG Ural-4320 Military Vehicle – is a detailed set of military vehicle prespectices for any type of digital art project. Included is a line art version, and colored with the lines. View other Military SVG's Here. Do you like downloading these free Scalable Vector Graphics that you are able to use for personal or commercial purposes? We are just getting this project started, and we aim to make this site big! Consider supporting the project here. This project is maintained and financed through a single individual, and I appreciate the support! Read the full article
#armoredvehicle#coloredvectorartwork#detailedvehicleSVG#digitalartasset#digitalillustration#graphicnovelvehicle#militarycomics#militarydesign#militaryillustration#militarySVG#militaryvectorillustration#militaryvehicleblueprint#militaryvehiclevector#scalablevectorgraphic#sevenperspectives#SVGmilitaryasset#tacticalvehicleblueprint#tacticalvehicledesign#technicaldrawing#Ural4320armoredcar#Ural-4320militaryvehicle#vectorlineart#vectormilitaryvehicle#vehicledesign
0 notes
Text
Vector Art
Vector Art is visual images that are made from geometric shapes defined on a cartesian plane. Unlike raster images, where information is saved for each pixel, vector art makes use of mathematical algorithms; storing data for coordinates and shapes. Vector art editors include Adobe Illustrator, CorelDraw and Vectr.
Vector Art’s benefits include scalability. Vector art’s style can be scaled up or down without loss of quality or creating a large file. This makes it useful in:
App and web development, because its scalability allows it to adapt to various screen sizes and device types.
Animation for clarity and detail.
Computer-aided design (CAD) for manufacturing, engineering and design.
Adobe Illustrator is professional software that is used for creating digital art. Adobe has an extensive collection of tools to create graphics, great file exporting options, technical help online and support and file recovery.
Illustrator has three main tools for digital art:
The Pencil - Can be used to draw freestyle line segments which you can use to create any kind of shape freely.
The Brush - The Brush tool has a different set of pattern options, which can be helpful when adding decorative art.
The Pen tool - With this tool, you are able to create, then edit anchor points and paths. This can allow you to create curves and straight lines for the shapes, like squares, circles etc.
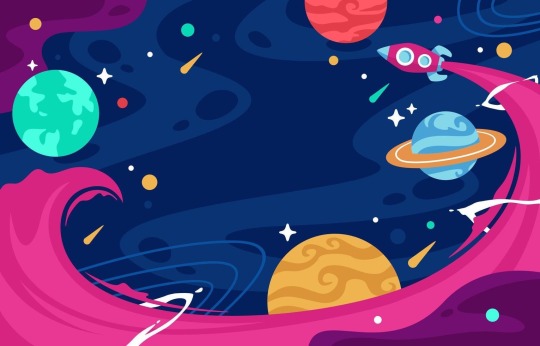
There 3 images I have picked, a space one, a portrait of Dr House, and an art company logo.
The tools used in the first image could include the Pen, Direct Selection, Selection, Curvature tool, and the Ellipse. The image itself works well due to its colours and art style. The complimentary colours in this piece are used to enhance its contrast which I believe works well with the purple, yellow and blue. This creates a sense of depth as well as clarity of focal points and of the foreground vs background. The vector art used to make the shapes are cleverly made, like how the design for the rocket trail gives it a sense of movement.
The second image shows a vector art interpretation of the lead character. To create this piece the artist used the Pen, Brush, Direction Selection, Selection, and Curvature. The colours in the art blend well together, through the use of gradients and transparencies. When used with highlights and shadows they really emphasize House’s character.

The tools to create image 3 are the Pen, Direction Selection, Selection, and Finally the Curvature. The shapes such as squares, polygons, and triangles have been used to create objects. To finish, the logo cleverly makes use of the symbolism to tie together the ideas of art and magic.
Bibliography
Rogers v. Koons, 960 F.2d 301 (2d Cir. 1992)
Adobe Inc. (2019). Adobe Illustrator, Available at: https://adobe.com/products/illustrator.
Corel Corporation. (2021). CorelDraw.
Vectr.
BBC. Vector graphics. Available at: https://www.bbc.co.uk/bitesize/guides/zsnbr82/revision/8#:~:text=Vector%20graphics%20are%20stored%20as,by%20looking%20at%20its%20attributes
https://www.vectorstock.com/royalty-free-vector-21090179
1 note
·
View note
Text
Add font to inkscape

If your browser shows other SVGs but not yours, you've probably missed either step 6 (converting to text) or step 7 (plain SVG) above. Once you've saved your file, if your browser supports SVGs (like recent versions of Firefox), you should be able to preview your file in it. make sure you choose "plain SVG" from the drop-down list, not "Inkscape SVG"! If you don't do this, then commons may display only black boxes were the text is.ħ. This converts your free-flow text object into normal text-objects. While your text object is selected, go to Text -> Convert to Text. (or Shift + Ctrl + D) and click on the button saying "fit page to selection".Ħ. If you are using a PC, you will copy the glyphs from your. Turning on repertoire mode will allow you to view all alternate characters connected to that specific font. If using Font Book, make sure repertoire mode is turned on. Resize the page to fit to your object: go to File > Document Properties. To use glyphs in Inkscape, you will first have to open the Character map (PC) or Font Book (Mac). (Control keeps the ratio intact, which stops the text from becoming distorted.) What you're really defining here is the "default display size", because the great thing about SVGs is of course is that they can scale without loss of quality.ĥ. Hold down "Ctrl" and resize your text as required. Choose the font and size you want by pressing Shift + Ctrl + T.Ĥ. Press the "arrow" icon (or "F1") to 'select' your text object. Paste in your text from your other text editor. Click on the "text object" icon (like an "A") on the left hand menu - number 11 in the illustration - or hit "F8".ģ. Open up Inkscape and start a new document.Ģ. an ability to view the text in a text editor on your computer (in other words.Sometimes you might want an image of text, though, if you want to ensure that a character is viewable even though a reader might not have the required fonts, or if you want to show off a particular font. Usually, text is best represented as text, via a font that represents Unicode, because it enables readers and re-users to search, copy-and-paste, and edit the text easily. This is a tutorial on creating SVG representations of text using Inkscape, an open source vector graphics editor.
0 notes
Text
Add font to inkscape

If your browser shows other SVGs but not yours, you've probably missed either step 6 (converting to text) or step 7 (plain SVG) above. Once you've saved your file, if your browser supports SVGs (like recent versions of Firefox), you should be able to preview your file in it. make sure you choose "plain SVG" from the drop-down list, not "Inkscape SVG"! If you don't do this, then commons may display only black boxes were the text is.ħ. This converts your free-flow text object into normal text-objects. While your text object is selected, go to Text -> Convert to Text. (or Shift + Ctrl + D) and click on the button saying "fit page to selection".Ħ. Resize the page to fit to your object: go to File > Document Properties. (Control keeps the ratio intact, which stops the text from becoming distorted.) What you're really defining here is the "default display size", because the great thing about SVGs is of course is that they can scale without loss of quality.ĥ. Hold down "Ctrl" and resize your text as required. Choose the font and size you want by pressing Shift + Ctrl + T.Ĥ. Press the "arrow" icon (or "F1") to 'select' your text object. Paste in your text from your other text editor. Place your mouse over the font and double click to place the gradient. Next, click on Create and edit gradients and select Radial gradient top left. Click anywhere on the canvas and type out your text. On the left side panel click Create and edit text objects (symbol A). Click on the "text object" icon (like an "A") on the left hand menu - number 11 in the illustration - or hit "F8".ģ. Step 1 - Type out text and add Radial Gradient. Open up Inkscape and start a new document.Ģ. an ability to view the text in a text editor on your computer (in other words.Sometimes you might want an image of text, though, if you want to ensure that a character is viewable even though a reader might not have the required fonts, or if you want to show off a particular font. Usually, text is best represented as text, via a font that represents Unicode, because it enables readers and re-users to search, copy-and-paste, and edit the text easily. This is a tutorial on creating SVG representations of text using Inkscape, an open source vector graphics editor.
0 notes
Text
How to Launch a Graphic Design Studio
If you're interested in launching your own graphic design studio, you'll need to choose a business structure that suits your needs. The most common business structures are a sole proprietorship, partnership, limited liability company, or corporation. In any case, it's important to choose a legal business structure that will protect you from personal liability. Most businesses that run out of a physical space need a CO, or Certificate of Occupancy. This document confirms that the space meets government regulations, building codes, and zoning laws. A CO is obtained from your landlord. It's important to understand that major renovations might require a new CO. If this is the case, make sure your lease has provisions that allow you to delay payment until you've obtained a new CO.
While many graphic design studios specialize in a single service, many offer a variety of creative options to fit the needs of your business. For example, a typotherapy studio will focus on the use of typeface to create a brand's identity. The studio will work with you to create a brand identity that is both creative and functional, and will make it stand out amongst the crowd.
The Graphic Design Studio software lets you create a variety of designs and vector graphics. It supports a variety of image formats, including SVG, PDF, PNG, JPEG, BMP, TIFF, GIFF, and EPS. It also allows you to scale your designs without losing their sharpness. The software can even be used to create a transparent background to help your designs stand out.
A graphic design studio can help you create an effective, unique brand identity that can help increase your sales and brand awareness. Whether it's a print advertisement in a magazine, a direct mail marketing campaign, or an informational brochure, a high-quality graphic design can enhance any type of marketing material and increase brand awareness. A good agency will be able to handle all of your graphic design needs, from digital to print design.
When choosing a graphic design studio, look for a company that has a stable, long-term working environment. Agencies usually have experienced designers who can mentor new designers. This experience can be invaluable in the long run, and the quality of your design work will be higher. You should also look for a design studio that offers flexible hours and a full-time staff of graphic designers.
0 notes